
Last Updated on July 18, 2024
Building a website with Drupal is an excellent choice for a flexible, secure, and scalable content management system. Nowadays, many users prefer to create websites using the WordPress editorial system. There are also other platforms, such as Joomla and Wix. However, that doesn’t mean some individuals prefer content management systems that lie outside the mainstream and still provide a great way to build your online presence. Drupal does precisely that.
The good news is that Drupal version 10 was released relatively recently, significantly advancing this CMS’s entire ecosystem. New features and improvements are designed to enhance the user experience for both developers and content managers.
Drupal 10 has a modernized administrative interface that makes website management more intuitive. The Claro administration theme, which is now the default in Drupal 10, provides a cleaner, more accessible user interface that is also responsive, ensuring that it works well on mobile devices as well as desktops.
Another significant enhancement is the inclusion of the Olivero frontend theme. This theme is designed to be visually appealing and accessible, conforming to the latest web standards. It’s a great starting point for any new Drupal website, providing a contemporary look and feel that is both user-friendly and inclusive. Now, let’s look at how to build your website using Drupal.
Build Drupal Website:
Key Takeaways
- Drupal’s versatility makes it ideal for a broad range of websites.
- Customization and expansion are possible through themes and modules.
- Regular updates and a supportive community enhance Drupal’s security and utility.
- Build Drupal Website:Key Takeaways
- Preparing for Drupal Installation
- Installing Drupal
- Configuring Your Drupal Site
- Designing and Theming
- Adding Functionality with Modules
- Content Creation and Management
- User Management
- Maintaining Website Security
- Extending and Customizing
- Drupal Community and Resources
- Frequently Asked Questions
Preparing for Drupal Installation
Before you build a Drupal website, ensuring you have the right environment is essential. This process involves securing a reliable hosting provider and installing Drupal directly from the web hosting provider’s environment. Of course, you can do it manually, but for beginner users, this approach is much more complicated than automatic installation from your web hosting administration.
Choosing a Hosting Provider
When selecting a hosting provider for your Drupal site, look for a service that meets the system requirements necessary to run Drupal effectively. Hostinger is a solid choice, offering affordable plans that support PHP, which is required for Drupal. They also provide MySQL databases with their packages, ensuring compatibility with Drupal’s database needs.
Installing Drupal
The installation process is foundational when preparing to build a website with Drupal. Ensuring a smooth installation sets the stage for a secure and functional website. This section will guide you through using the installer script provided by hosting platforms like Hostinger and executing a manual installation.
Automatic Installation Steps (Hostinger)
If you’ve chosen Hostinger as your web hosting service, you can use the auto-installer feature in your hPanel. Here’s how to use it:
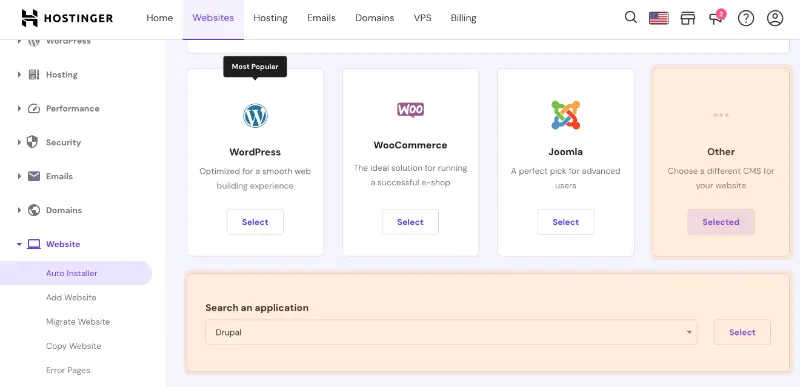
- In hPanel, navigate to the Auto Installer under the Website section.
- Select Drupal from the list of applications.
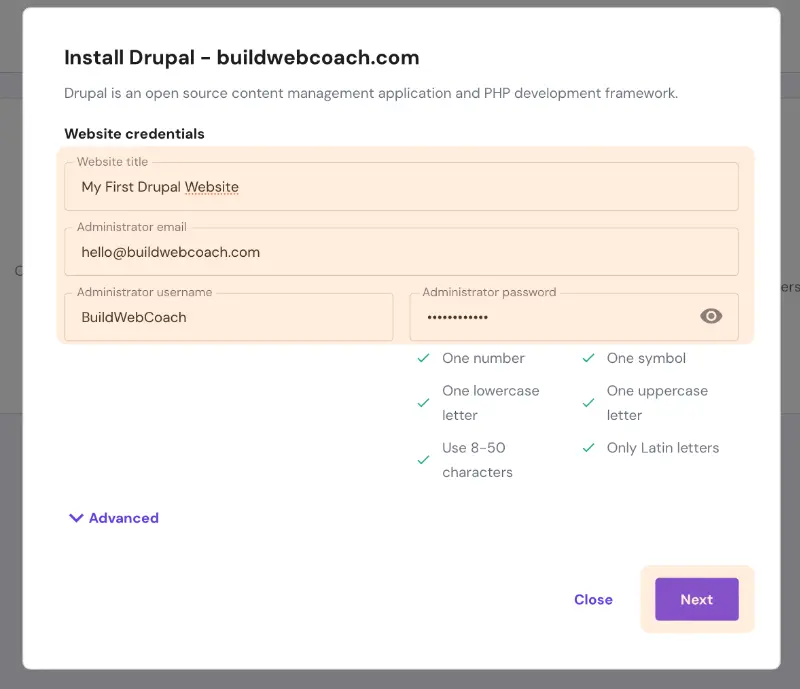
- Fill out the form with your site information, including the admin login and database information. Selecting the most current version of Drupal is generally best to ensure optimal performance.
- Click Install. The installer will configure Drupal on your hosting account, and you’ll be ready to swiftly move on to the next steps of site-building.
Manual Installation Steps
If you prefer or need to install Drupal manually, which is often the case for a localhost or VPS environment, here’s what you need to do:
- Download the latest version of the Drupal ZIP file from the Drupal official website.
- Within the hPanel, go to File Manager and upload the ZIP file to the
public_htmldirectory. - Unzip the contents of the Drupal package in the same directory.
- Go back to the main hPanel, locate and select MySQL Databases, and create a new database and a user for your Drupal site. Record the database details, as you’ll need them soon.
- Visit:
yourwebsite.com/core/install.php
in your web browser to begin the installation process. - Select your preferred language and then choose an installation profile. For most users, the Standard profile is recommended. Choose Minimal only if you have advanced knowledge and require a more customized installation.
- Enter the database details you noted earlier and fill out your site information and admin account details.
Setting Up a Database
Drupal requires a database to store its content and settings. To set this up, access your hosting control panel, typically cPanel or a similar service provided by your hosting company. Create a new database and note your database name, username, and password—you’ll need these details during the Drupal installation process.
Remember that meeting the required PHP version and securing a MySQL database are critical steps for the Drupal installation. Keep these details safe and easily accessible for the next steps of your Drupal site setup.
After completing these steps, you should have a fully installed Drupal instance ready for content creation and theming. Utilizing tools like Composer and Drush can further streamline the process of managing and configuring your Drupal site, especially for more complex setups.
Configuring Your Drupal Site
Setting up your Drupal site involves a careful approach to basic configurations and user management. This ensures a solid foundation and controlled access for different roles within your site.
Basic Configuration
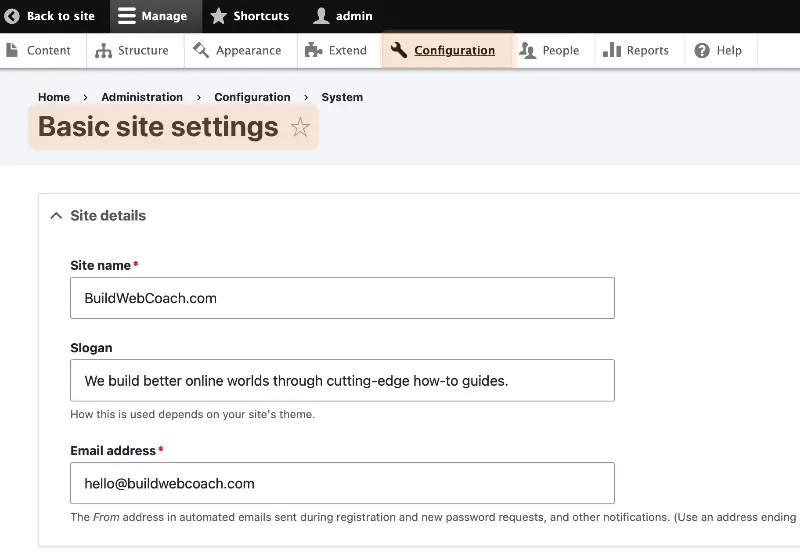
Your initial Basic Configuration will shape the entire site. Access the ‘Basic site settings’ under the ‘Configuration’ tab. Here, you’ll define your Site Name, Slogan, and Email Address, representing your site’s identity and the email used for automated communications. When altering Settings, ensure your Username and Password are secure to prevent unauthorized changes.
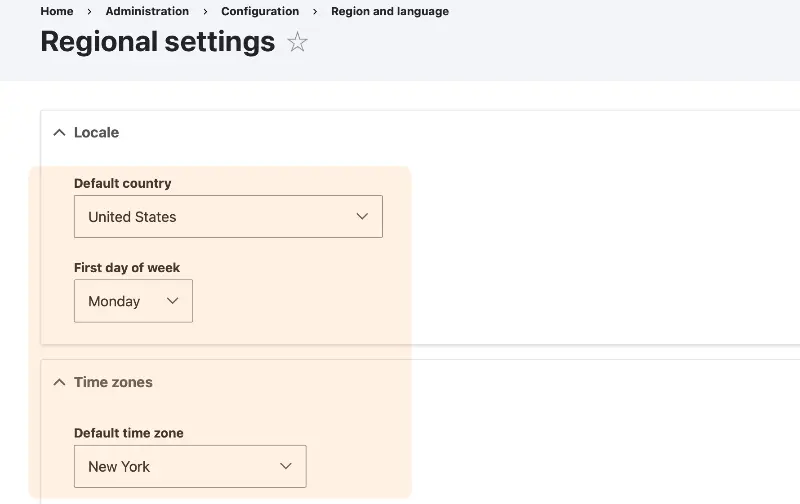
Next, adjust the default country and time zone under ‘Regional settings.’ You might also want to configure your file system paths and image toolkit preferences.
To further refine your site’s usability, tweak the error reporting settings to match its deployment stage. While verbose messages are helpful during development, they should be limited to a live site.
Managing User Roles and Permissions
Under Managing User Roles and Permissions (the ‘People’ tab), you can control who can do what within your Drupal site becomes evident. Visit the ‘People’ section to create roles with specific permissions.
- Administrator: Full access to all aspects of the site. Handle with care.
- Editor: Typically has the right to create, edit, and delete content.
- Authenticated User: Registered users with permissions beyond what anonymous users have.
When assigning Permissions, be specific. Check the relevant boxes that grant only the access required for the role. Remember to save your configurations after making changes.
Maintaining a clear structure of roles and permissions is crucial to the security and functionality of your website. It’s your safeguard against potential misuse and a means for efficient content management.
Designing and Theming
Designing and theming are critical for creating an engaging user interface that aligns with your brand when building a website with Drupal. These processes involve selecting a suitable theme, adjusting layouts, and customizing styles with CSS and HTML to define how your content is presented.
Selecting and Installing Themes
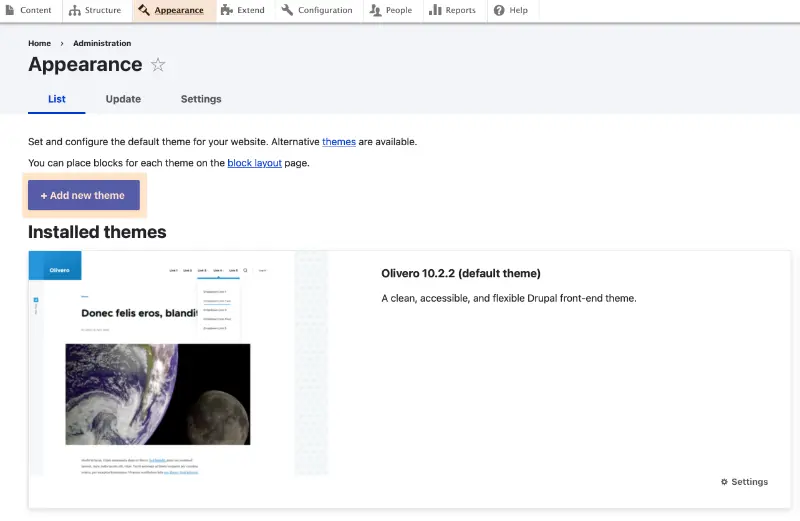
To get started, browse the Drupal theme repository or marketplaces to select a theme that meets your visual and structural requirements. Themes govern the aesthetic and some functional components of your Drupal CMS, acting as a blueprint for your site’s appearance. When you find a theme that suits your needs, install it by navigating to Appearance in your Drupal dashboard and uploading the theme or installing it directly from the URL.
Steps to Install a Theme:
- Visit
Appearance>Add new theme - Either enter the URL of the theme or upload the theme file
- Click
Continue - Once installed, click
Set as defaultto activate
Themes come with predefined layouts, but many support the Layout Builder, a Drupal feature that allows for customized page layouts without writing code.
Customizing Themes
Customizing your theme involves altering the CSS and HTML files to tailor the visuals and layout to fit your brand and content strategy better. Creating a sub-theme for these customizations is essential to ensure that your modifications are not overwritten during updates.
For CSS customizations:
- Locate your theme’s CSS file.
- Make your changes, such as altering colors or fonts.
For HTML customizations:
- Twig templates are used in Drupal to define the markup.
- Modify existing Twig template files or create new ones to adjust the HTML structure.
Remember to clear the cache from your Drupal CMS after making changes to see them reflected on your website. This step ensures that Drupal generates new page versions with your updated styles and layouts, which is vital for the changes to take effect across your website’s user interface.
Adding Functionality with Modules
Leveraging the power of modules is essential to enhancing the functionality of a Drupal website. Modules are the building blocks that extend your website with custom features and integrations.
Core vs. Contributed Modules
Core Modules are part of the Drupal distribution and provide essential functions for your site. You can enable or disable these modules as needed, but they are not meant to be altered. These modules offer basic features like user management, content publishing, and search functionality.
On the other hand, Contributed Modules are created by the Drupal community and can be downloaded from the Drupal Module development page. These vary widely, from SEO tools to complex e-commerce systems. Before adding contributed modules to your site, ensure they are compatible with your version of Drupal and check their maintenance and security status.
Installing and Configuring Modules
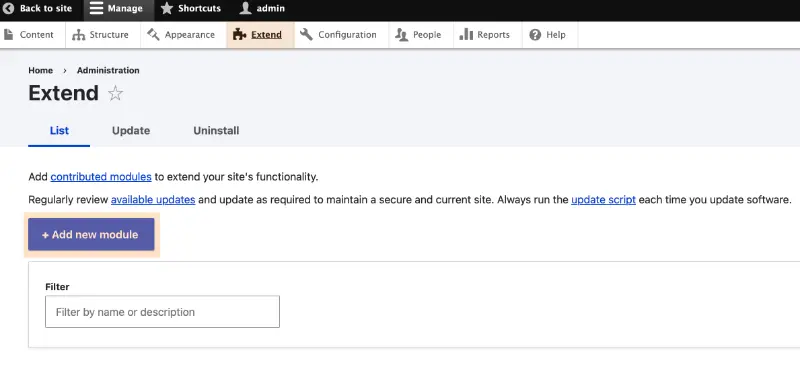
To install a module, navigate to the ‘Extend’ tab in your Drupal admin panel. Here, you can install modules by providing a URL to the module’s archive file or uploading a tar.gz or zip file directly. Additionally, Drush or Composer simplifies this process for those comfortable with the command line.
After installation, you must configure the module to tailor its functionality to your needs. To do so, navigate to the module’s configuration page, which typically appears in the admin menu under the section relevant to the module’s functionality.
Remember, managing modules balances extending capabilities and maintaining site performance. Each module adds overhead, so be judicious about what you add, keeping your site’s speed and agility in mind.
Content Creation and Management
Managing a diverse range of content is crucial when building your Drupal website. Familiarizing yourself with content types, menu structures, and taxonomies will ensure your site remains organized and accessible.
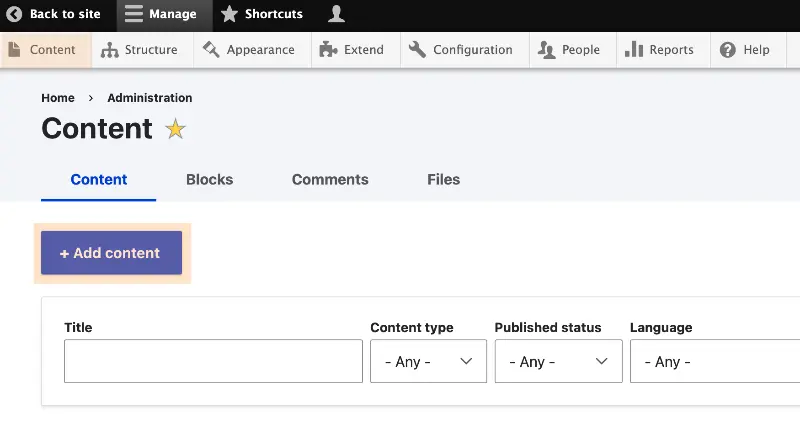
Using Basic Content Types
In Drupal, content types are pre-defined structures that control the form and function of your content. You can access basic content types like Articles for time-sensitive content and Basic pages for static pages such as ‘About Us.’ To add new content, navigate to Content > Add content and select the necessary type (Article or Basic Page). Remember, each content type has publishing options allowing you to control visibility, scheduling, and authoring information.
Managing Menus and Taxonomies
Menus in Drupal are powerful tools for site navigation. You can manage them under Structure > Menus. Here, you can define the structure of your site’s navigation by adding, rearranging, or removing menu items. Taxonomies, on the other hand, are used for organizing content through terms in vocabularies. This categorization, available under Structure > Taxonomy, enhances your site’s filters and search capabilities by tagging and categorizing content.
Creating Custom Content Types
Beyond the basics, Drupal allows you to create custom content types tailored to your requirements. Under Structure > Content Types > Add Content Type, you can define new types with custom text, media, and file fields. This bespoke approach ensures that you can craft content formats that accurately reflect the unique components of your website, like product listings or user profiles.
User Management
Managing user accounts and access rights effectively is critical to administering your Drupal website. Ensuring the right balance between accessibility and security requires a clear understanding of roles, permissions, and user account creation.
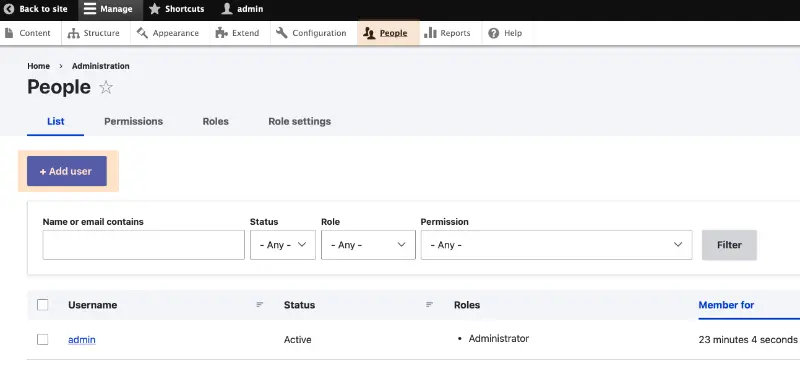
Creating User Accounts
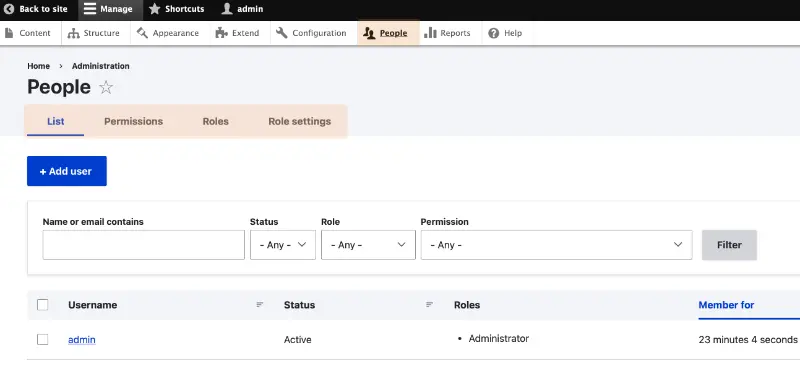
To create a user account in Drupal, navigate to the administrative dashboard and access the ‘People’ section. Click ‘Add user’ and fill in the necessary details, such as username and email address. It’s crucial to carefully configure authentication settings, as they play a significant role in the security and workflow of your site’s management.
- Go to Administer > People > Add user.
- Enter username and email address.
- Set an initial password, which the user can later change.
- (Optional) Assign roles immediately upon creation.
Assigning Roles and Permissions
After creating user accounts, assigning roles and permissions is your next step to customize the access levels of different users. Drupal allows you to define roles such as ‘administrator’ or ‘editor,’ each with a specific set of permissions that control what users can and cannot do.
- Administrator Role: Full access to all administrative features and content types.
- Editor Role: Limited access, typically to content editing and creation.
To assign roles and modify permissions:
- Go to Administer > People.
- Locate the user and select the edit operation to modify their roles.
- Check the boxes next to the roles you wish to assign.
- Confirm the changes by clicking Save.
Revisit the user account management guide and role creation documentation for step-by-step instructions and additional tips on managing users effectively.
Maintaining Website Security
Ensuring the security of your Drupal website is a critical responsibility. Staying current with security updates and having a regular backup and monitoring system are foundational steps to protect your site.
Applying Security Updates
Timeliness is key: When security updates are released for Drupal, they often address vulnerabilities that attackers could exploit. It’s essential to apply these security updates as promptly as possible to minimize the risk of security breaches. Check the Drupal security advisory regularly to stay informed about new security patches.
Regular Backups and Monitoring
Backup Routine: Establish a schedule for regular backups of your website, including all files and databases. This preventive measure ensures you can restore your site to a secure state during an incident.
Monitoring: Logically monitoring your website’s activity helps you promptly detect and respond to suspicious behavior. Look out for unusual traffic patterns or unauthorized access attempts, as these can indicate security issues that need immediate attention. Make it a habit to examine the logs periodically and, if possible, use automated tools to help with this analysis.
Extending and Customizing
Drupal’s flexibility stems from its modular structure and theming capabilities, which let you create a unique and scalable website. Both modules and themes are essential tools that tap into Drupal’s robust framework and the extensive Drupal community resources, including hooks, to enhance your site’s functionality and appearance.
Creating Custom Modules
To extend the functionality of your Drupal website, you can create custom modules. These modules are tailored to your website’s specific needs. Firstly, identify a feature you need that isn’t provided out of the box or by existing contributed modules. Then, utilize hooks to interact with Drupal’s core. Hooks allow your custom module to “hook into” the rest of the Drupal system, altering or adding to its functionality.
- Begin by creating a
.info.ymlfile to define your module to Drupal. - Write your module’s functionality using PHP, employing Drupal’s API and adhering to its coding standards.
Custom modules can be uploaded to the Drupal.org repository, contributing to the community and helping others with similar needs.
Theming Advanced Techniques
Theming is an effective way to customize your site’s presentation. Advanced theming techniques give your site a unique and professional look. The theme layer in Drupal separates the content and presentation of the site, ensuring your customization is as seamless as possible.
- Use template files (
*.html.twig) to control the markup of your website. - Leverage CSS and JavaScript to refine your site’s aesthetics and interactivity.
For complex customizations, understand Drupal’s theming conventions and use preprocessing functions to manipulate variables before they are output to the template. Adding specific files for content types, blocks, and views can make your theme more scalable and dynamic.
The theme is your canvas; the modules are your paints. By leveraging Drupal’s robust and customizable framework, you can create a scalable website that stands out in the digital space.
Drupal Community and Resources
Accessing the vast array of community-driven resources can be crucial for support and knowledge enhancement when building your Drupal website. The Drupal community is an open-source ecosystem that offers extensive documentation, tutorials, and user-generated content to assist you throughout your website development journey.
Finding Help and Documentation
When you need assistance or are looking for comprehensive guides, Drupal.org is your central hub for help. It offers a wealth of documentation and tutorials suitable for beginners and advanced users. Topics are meticulously organized, from site building to theming and module development. For specific challenges, the Drupal support section presents forums and user groups ready to address your inquiries.
- Where to start:
- Official Documentation: Get familiar with the fundamentals.
- Community Forums: Pose questions and get answers from experienced users.
- User Guides: Follow step-by-step instructions for site-building tasks.
Participating in the Drupal Community
Being part of the Drupal community means more than just taking—you can give back and shape the platform. Engaging in community discussions and local meetups allows you to connect with fellow developers, collaborate on open-source projects, or find mentorship. Whether you contribute code, participate in usability testing, or offer solutions in forums, your contributions drive the evolution of Drupal.
- Ways to engage:
- Issue Queues: Contribute to the conversation or code patches.
- Drupal Events: Attend global and local events to network and learn.
- Volunteer: Offer your skills to grow and support the community.