
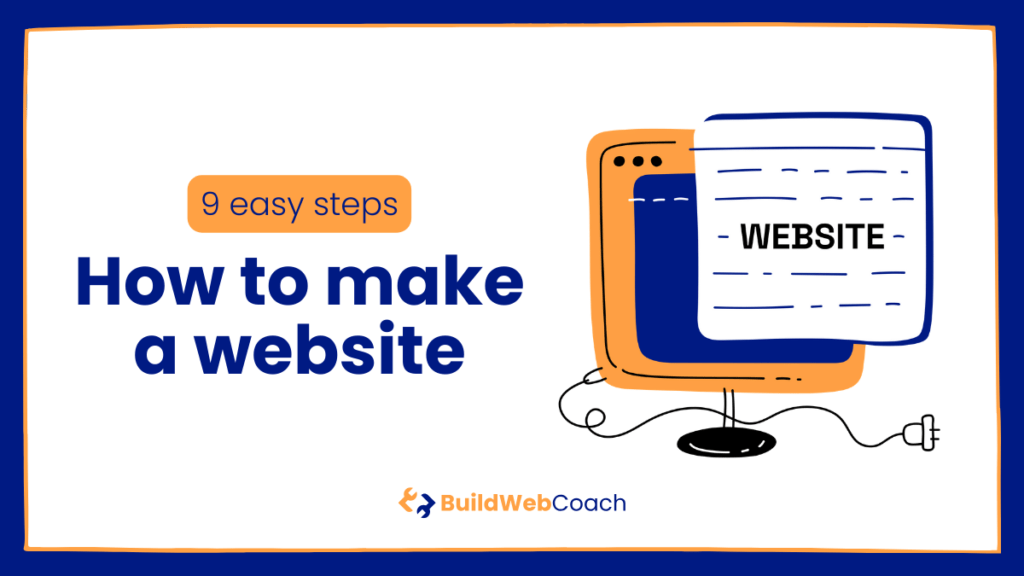
How to make a website
Step-by-step guide on how to create the personalized website of your dreams.
Creating a website might seem an intimidating task best left to tech gurus and computer wizards. Look a little deeper, however, and you will see that building a website from scratch is possible, regardless of your relationship with technology.
Today, everyone can use a website builder that makes website design accessible for even the most technologically challenged.
From personal blogs and professional portfolios to small businesses and large-scale e-commerce stores, creating a website is the first step in establishing your digital footprint and reaching a global audience.
This in-depth guide strips away the complex geek speak surrounding website development and breaks down the steps to create a professional website you can be proud of.
How to Make a Website in 9 Easy Steps (Summary)
Learn how to make a website from scratch as a beginner using a website builder. Step-by-step guide for creating your own customizable site.
Time:
ca. 4 hours
Tools Needed:
A computer, tablet or laptop.
Cost:
ca. 36 USD
Things Needed:
Especially your time and smile.
9 Steps to Making your Perfect Website:
Step 1: Create a Website with a Purpose | Look at step 1
Before laying the foundations for your first website, you should establish its purpose.
Step 2: Register a Domain Name | Look at step 2
The domain name is the URL visible in the address bar of a web browser.
Step 3: Choose a Web Hosting Provider | Look at step 3
All websites you visit have something in common: they are all hosted on a server.
Step 4: Make a Website From Scratch with WordPress | Look at step 4
Once you have your domain and hosting sorted, the next decision is to select the best website builder.
Step 5: Selecting a Theme – Design Your Website | Look at step 5
WordPress themes are the window dressing to your content and essential to creating the layout of your website.
Step 6: Using Pages or Posts | Look at step 6
Pages and posts are two types of content serving different uses in WordPress.
Step 7: Extending Website Functionality with Plugins | Look at step 7
Plugins are extra pieces of code you can “plug in” to your site to add features that aren’t standard with WordPress.
Step 8: Search Engine Optimization (SEO) | Look at step 8
SEO is a series of best practices to ensure your site stands out in the search engines.
Step 9: Connect Your Website to the World Wide Web | Look at step 9
Launching a website means you make the website accessible to the public on the internet.
Whether you’re an artist looking to showcase your work, an entrepreneur striving to create an online presence for your business, or someone toying with the idea of starting a blog, this guide will equip you with the essential knowledge and tools needed to create an engaging, compelling, and fully functional website.
So, whether you’re a tech novice or a budding developer itching to dive into code, gear up for an exciting ride into website creation. Welcome to your first step of turning your digital dreams into reality!
- How to make a website
- How to Make a Website in 9 Easy Steps (Summary)
- Step 1: Create a Website with a Purpose
- Step 2: Register a Domain Name
- Step 3: Choose a Web Hosting Provider
- Step 4: How to Make a Website From Scratch with WordPress – Number 1 in Websites
- Step 5: Selecting a Theme – Design Your Website
- Step 6: Using Pages or Posts: What's the Difference?
- Step 7: Extending Website Functionality with Plugins
- Step 8: Search Engine Optimization (SEO)
- Step 9: Go For Launch – Connect Your Website to the World Wide Web
- Promote Your Website
- Set Up Your Website Today – It's Easier than You Think
- Frequently Asked Questions (FAQ)
- Need more inspiration on creating websites?
Step 1: Create a Website with a Purpose
Before laying the foundations for your first website, you should establish its purpose. Every website needs a reason to exist; otherwise, no one will get to see your hard work. Here’s how to define why your website deserves a place on the web.
1. Define Your Goal
Ask yourself why you want to create a website. There is a sea of infinite possibilities. You may want an online platform to showcase your portfolio or plan to start a blog about your passion for cooking.
Do you want to sell your handmade crafts or expand your local business to broader markets? Clearly defining your website’s goals will guide your decisions throughout the website construction process and significantly affect your site structure, design, and content.
2. Target Audience
Who are you making a website for? Even if your website is a creative outlet, you still want people to visit, and it will be easier to target them when you know who they are.
Identifying your target audience will help you make strategic decisions about the site’s design, layout, and content to create an online presence that serves a community of like-minded individuals who will keep coming back for more.
3. Different Kinds of Websites
Once you have established your goal and identified your target audience, it’s time to select the type of website that best fits your needs. While there are many different types, most websites will fit into one of the following categories:
- E-commerce Website / Online Stores: Ideal for selling products or services online
- Personal Website or Business Websites: Perfect for sharing personal experiences, ideas, or expertise or showing off your business and how it can help.
- Portfolio Websites: Best for artists, designers, or photographers who want to showcase their work.
- Non-Profit: Suitable for charities or social cause organizations, helping to raise awareness and accept donations.
- Educational Websites: Perfect platform for creating online courses or offering educational resources and information.
Consider both your immediate needs and future growth plans. Your website is an investment in your online presence. Whether you’re a budding entrepreneur, a passionate blogger, or an innovative creator, your site should align with your purpose, reflect your brand, and cater to your audience’s needs.
Step 2: Register a Domain Name
The domain name is the URL visible in the address bar of a web browser. The best way to think of a domain name is to compare it to a street address because it’s literally your website’s home address on the web.
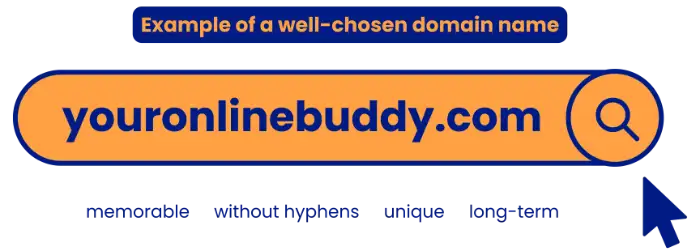
The domain name is how your visitors will find you out of the billions of other websites, so it needs to be memorable. A well-chosen domain name can help enormously with your branding, so shorter is better. Use these tips to come up with the perfect domain name:
- Keep it short and memorable, and use familiar words to avoid misspellings.
- Avoid hyphens, as these make it harder to remember and type.
- Be unique (you want to avoid being confused with a competing website or getting into trademark issues).
- If you are building a brand, choose a domain with the company name or a variation.
- Think long-term, as changing a domain on an established website is complex work.
With billions of registered domain names already taken, finding the perfect one can be challenging. However, the variations are limitless. Keep trying; you will eventually find the perfect custom domain name for your site.
This online domain checker lets you quickly check if a domain is registered. Use it as often as you need (it’s free) until you find a domain that’s not yet taken.
Step 3: Choose a Web Hosting Provider
All websites you visit have something in common: they are all hosted on a server. A server is a computer, much like the one you use to read this article, just more specialized.
A web host uses servers to host your site’s files. When someone types in your domain name, the server “serves” up the relevant files to your browser, such as HTML, CSS, and PHP files. It’s the browser’s job to translate the contents of the files into text, images, videos, and other document types you can see and read.
The hosting company ensures your website is accessible to all visitors worldwide, day and night. When you select your web host, you essentially rent out storage space on one of their servers, with larger, reliable companies like Hostinger responsible for millions of sites.
Other services your web host provides can include security to protect your site from hackers and end-to-end encryption to keep your visitor’s private information away from prying eyes. Many hosting services, like email, video hosting, and server management, may be optional and depend on your subscription plan type.
Types of Web Site Hosting
If everything goes according to plan, you will grow your website and attract more visitors, so select a host with flexible upgrade paths. Here’s a quick rundown of the most common types of hosting you will see at most hosting providers.
Free Website Hosting – Is It Worth It?
Newcomers are often tempted to create a new website using one of the many free web hosting services. However, this is not recommended if you are serious about building an enduring online existence.
Free hosts are typically slower than paid services, don’t allow custom domain names, have poor customer service, and post ads all over your site that detract from your branding. It may be free, but the cost to your brand will be high, and you will be adding more roadblocks to creating a popular website that can attract traffic.
Why go free with all those limitations when you can get website hosting for just a few dollars a month, with a free domain name hosted on fast servers that also comes with exceptional customer support?
Shared Hosting
Shared hosting is the most common type for starting websites. They are cheaper because your site is one of several hundred sites on one server. Unfortunately, traffic flowing to many different sites on a single server can impact the speed of every other site on that server. If you opt for shared hosting, choose a quality provider that limits the number of shared sites on a server.
You can think of shared hosting as like a street in your neighborhood. Imagine every house on your street is a website on the same server. Now, think about what happens when one or two of your neighbors have many friends and relatives visiting simultaneously. Traffic on your street slows to a crawl because there’s too much happening at once. Every house suffers, not just the ones with all the visitors.
VPS Hosting
After your site has been live for a while and you’ve done everything right, you will start attracting decent volumes of website traffic. It’s time to stop hogging the bandwidth and switch to a more powerful server option. Your hosting provider will usually dictate how many visitors your site can handle before they bump you to the next pricing tier.
The next step is a Virtual Private Server or VPS. A VPS is a middle-of-the-road option between cost and control. In a nutshell, you get a more powerful server serving fewer websites, so your site can handle more traffic while ensuring all website visitors get to travel in the fast lane.
Dedicated Servers
The ultimate goal for many people building a website from scratch is to create a site that attracts hordes of visitors every month. When you become the talk of the web and can bask in the glory of millions of adoring fans visiting every month, you will need to move to a more prestigious neighborhood where your site is the only one on the block.
This is a dedicated server or a computer of your own hosting your site. It’s fast and powerful, and you are not sharing bandwidth with other sites, so your visitors get the best experience. Dedicated servers are the most expensive type of hosting, but at this stage, the income you can generate from all that lovely traffic will be more than enough compensation.
Step 4: How to Make a Website From Scratch with WordPress – Number 1 in Websites
Once you have your domain and hosting sorted, the next decision is to select the best website builder. Your most promising option is to go with the most popular, most configurable, most user-friendly website builder on the web, WordPress.
You can build your website without any help from a builder, but it will require significant knowledge and experience in coding and possibly a university degree or two. Fortunately, website building with WordPress means you can get started right away.
There are two types of WordPress: WordPress.org or the self-hosted version, and the WordPress.com kind, a hosted blogging community run by Automatic, the creators of WordPress.org.
We recommend using self-hosted WordPress as you own your content and aren’t limited by the rules and regulations typical of a free blogging platform (remember what we said about free hosting above).
WordPress.com gives you limited control over your site’s appearance, making creating a unique brand all but impossible. You can’t monetize a WordPress.com blog, so it’s a terrible tool for building an online empire.
The learning curve is higher for WordPress.org, but the payoff is worth it, and website design with WordPress is easy once you know how. Other reasons we recommend WordPress include:
- It’s free and open source (meaning anybody can modify it).
- Don’t know how to code, no problem — you don’t need to.
- It’s infinitely customizable, so you can create whatever type of website you want.
- WordPress is suitable for all types of websites, from blogs and e-commerce to business sites.
- There is a vast and active community of developers and users.
- WordPress is secure and updated regularly against hacking exploits.
We wrote this guide for beginners like you, but WordPress is perfect for all levels, from complete newcomers to pro developers. So, if you are interested in developing your skills in HTML, Java, CSS, or any of the myriad web technologies once you have mastered the basics, WordPress has you covered.
How to Build Your Website on Hostinger
Installing WordPress on Hostinger is a straightforward task. Here are step-by-step instructions on how to get a simple website up and running that you can quickly customize:
- Login to the Hostinger control panel.
- In the control panel, navigate to the section labeled “Website.” There, you’ll see an option called ‘Auto Installer’. Click on it.
- The Auto-Installer section provides a variety of software that you can install on your hosting account. Find WordPress on the list, and click on it.

- You will now be asked to fill in your website information. This includes your website title, login credentials (username and password), email address, desired language, and the installation URL. Make sure to have a valid email address, as you will need it for admin purposes.
- Once you’ve filled in all the information, click the ‘Install’ button.
- The installation process will start, and you should see a progress bar. This might take a few minutes to complete.
- Once the installation is complete, you will see a confirmation message. You can now navigate to your website URL and visit your new WordPress website live.
- To manage your site, add posts, change themes, and other admin tasks, navigate to your website followed by “/wp-admin” in the URL (for example, www.mywebsite.com/wp-admin).
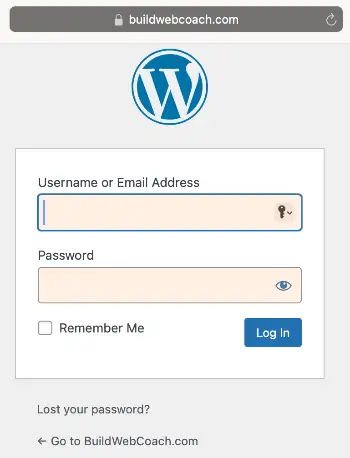
- Enter the login credentials you created during the WordPress installation process on Hostinger.
- You’re now within the WordPress dashboard, where you can customize your website, add new pages and blog posts, install themes and plugins, and much more.
Remember to update your WordPress installation, themes, and plugins to the latest version to maintain site performance and security. Hostinger’s control panel makes it easy to manage these updates so you can focus on designing your website and generating content.
Step 5: Selecting a Theme – Design Your Website
WordPress themes are the window dressing to your content and essential to creating the layout of your website. The theme controls aspects like color selection, footers, and sidebar positioning. Every theme relies on a CSS (Cascading Style Sheet) file to tell WordPress how your site should look. This essential file controls font faces, margins, indentations, line spacing, and more.
While the theme doesn’t do much to get eyeballs on your pages and blog posts, an attractive website will improve visitor retention and dwell time, which Google likes.
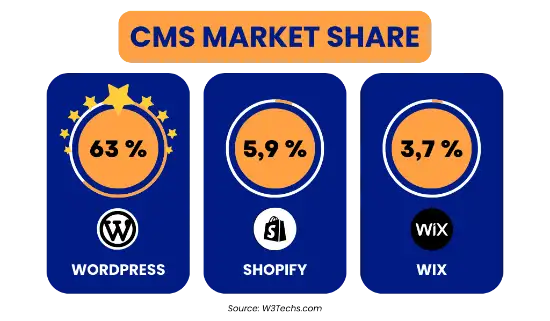
As of 2022, the number of themes available on WordPress.org was close to 10,000, but there are almost 60,000 themes available for the platform from various other vendors.
With so much choice, choosing a theme can be a tad overwhelming for newcomers. This is why knowing your site’s main reason for existing is essential, as it will help you narrow your selection to a more manageable level.
A blogging site should prioritize SEO-friendly designs with intuitive navigation. Two notable examples of excellent blogging themes include Astra and OceanWP, both well-known for their ease of use but with plenty of power under the hood.
E-commerce themes will focus on delivering an excellent user experience, emphasizing speedy delivery of product pages and descriptions in an attractive, easy-to-read format. Check out website builders like Divi and GeneratePress, both great platforms that support a wide variety of themes for e-commerce sites.
Photographers and artists are spoiled for choice, with tons of themes designed around showcasing work without distractions. Try out Air and Clean Portfolio, lightweight, highly responsive themes perfect for creative professionals.
How to Install a Theme for Your Website
WordPress makes installing a theme super easy.
- Log in to your admin dashboard
- Navigate to ‘Appearance’ in the side menu
- Click on “Themes” and “Add New”
- Browse for a theme you like and click “Install”
- Now click “Activate” to make the theme live

Themes can also be uploaded in .zip format. Simply select the “Upload Theme” option, and WordPress will upload and install it.
The Difference Between Themes and Templates?
Themes and templates have related but specific functions in WordPress. While the theme dictates the overall design and functionality of the site, a website template is a blueprint for individual sections of the website, such as a sales landing page distinct from your blog. Theme developers often create templates to help you maintain a consistent look and feel across the site.
Step 6: Using Pages or Posts: What’s the Difference?
Pages and posts are two types of content serving different uses in WordPress.
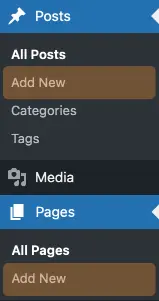
Posts: These are the bread and butter of your typical blog. WordPress defaults to listing blog posts on the website’s blog page in reverse chronological order. Posts can be categorized under tags and categories and have a publish date. They’re included in the website’s RSS feed and often have a section for commenting. Posts are dynamic and are updated more frequently than pages. Click Post > Add New in the sidebar menu to add a new post.
Pages: These are static, not listed by date, and do not use tags or categories. Good examples of pages you are likely familiar with include the “Home,” “About Us,” and “Contact” pages. Pages are often omitted from an RSS feed and cannot typically be commented on. They also don’t show up in the “Recent Posts” widget. Pages are ideal for non-dynamic content; once a page is set up, the content rarely changes. Add pages by clicking Pages > Add New in the sidebar menu.
Another key difference is that posts are social (shareable and comment-able) while pages are not (usually). Also, WordPress uses different templates to display posts and pages.
Setting Your Site’s Home Page
Your home page can be your blog page or a regular static page, but you need to tell WordPress what to display when visitors land on your site.
Your homepage is the first thing visitors see when they arrive on your website, so make the content engaging and informative. Setting up your homepage in WordPress is straightforward.
Step-by-step Instructions for Creating a Page as Your Homepage
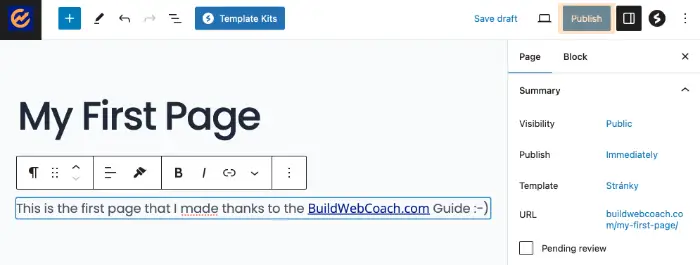
Create a New Page: From your WordPress dashboard, navigate to ‘Pages’ > ‘Add New.’ You could name this page ‘Home,’ ‘Main,’ ‘Homepage,’ or whatever makes sense for your site.
Design Your Page: Add your content. You could include information about your business, images, slideshows, or anything else you think would engage your audience immediately.
Publish the Page: Once satisfied with your page’s design, click ‘Publish’.
Creating a Blog Page as Your Homepage
Create a Posts Page: If you’re running a blog and want a separate page displaying your latest posts, you should create another new page. You might call this page ‘Blog’ or ‘News’. This page doesn’t need any content, just a title.
Set Your Homepage
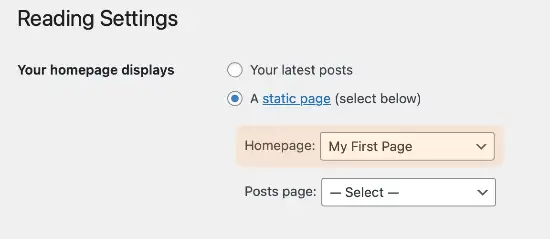
Navigate to ‘Settings’ > ‘Reading’ in your dashboard. Under ‘Your Homepage Displays,’ select ‘A static page,’ then choose one of the pages you just created as your ‘Homepage’ or ‘Posts page’.
Save Changes: Click ‘Save Changes’ at the bottom of the page. Your new homepage is all set!
Remember that your website’s success greatly depends on your homepage’s effectiveness. It should communicate who you are and what you do while enticing visitors to explore your site further.
Don’t forget about navigation. Ensure the links on your homepage guide your users smoothly and logically through your site. Adjust your homepage to highlight your most recent or essential work as you continue adding content to your site.
With WordPress, updating and modifying your homepage is just as easy as setting it up, so you don’t have to get it perfect the first time. Your homepage should evolve as your site grows and changes. Happy building!
Step 7: Extending Website Functionality with Plugins
Now, we come to one of the most powerful features of WordPress, the plugins section. Plugins are extra pieces of code you can “plug in” to your site to add features that aren’t standard with WordPress. These tools make it easy to create and customize your website to your heart’s content but don’t go too nuts.
The plug-in market is a smorgasbord of choices, from creating contact forms and improving SEO to image sliders and email subscription services. It’s easy to get excited and overload your new site with too many plugins. Remember that every plugin you install will add extra “bulk” to your website, which means too many will slow it down.
How to Choose Plugins
Limit yourself to necessary plugins, which will help ensure site stability and speed. Many plugins are free, while others have a free and paid version.
In our experience, if you are going the free route, use only those plugins with paid options. The functionality in the free version will be limited but still valuable, and you can be confident that the plugin will be well-supported.
Free plugins are often created by enthusiasts with less experience and no business reputation at stake, so they are usually lower quality and infrequently updated, which can create a security risk for your site.
Plugins we recommend for new sites include SEOPress for search engine optimization (more on that below), Gutenberg for designing your posts and pages, and SMUSH to ensure your images don’t slow down your page load speeds.
Here’s a list of a few more plugins you might find helpful:
- W3 Total Cache or WP Super Cache: These caching plugins store regularly accessed data to significantly improve your site’s performance, as the browser doesn’t need to redownload files.
- UpdraftPlus: You need to back up your site to protect your hard work, but native WordPress doesn’t make it easy. UpdraftPlus simplifies backing up your site, ensuring a fast recovery in case of data loss or issues.
- Wordfence Security: Wordfence is a powerful security plugin that helps protect your site from malware, hackers, and other security threats.
- Jetpack: Jetpack is a multifunctional plugin that offers a variety of tools, including site statistics, downtime monitoring, and social media sharing. We would need an entire article to describe everything Jetpack can do, so be sure to check it out.
- Contact Form 7 or WPForms: These plugins allow you to create and manage contact forms, making it easy for visitors to contact you.
- MonsterInsights: Google Analytics is a beast that can be tough to get your head around. MonsterInsights helps to flatten the learning curve by integrating Google Analytics into your website in a way that makes sense.
- WooCommerce: If you plan to run an online store, WooCommerce is pretty much the industry standard for adding e-commerce functionality to your site.
- Redirection: This plugin allows you to manage 301 redirects and track 404 errors, improving your site’s user experience and SEO.
- AMP for WordPress: To make your site more mobile-friendly and improve load times on mobile devices, consider implementing AMP (Accelerated Mobile Pages).
Install plugins by heading to Dashboard > Plugins > Add New. From here, you can browse the extensive plugin market using a keyword for the type of plugin you need or type in the name if you know the one you want. Click the ‘Install Now’ button, and the system will do the rest.
You must now activate the plugin, so click on Plugins > Installed Plugins. Find your plugin in the list and click the ‘Activate’ link. Your plugin is now active and ready to start working on making your site better.
Step 8: Search Engine Optimization (SEO)
Search engine optimization is a massive topic on its own. We cover SEO in-depth elsewhere, but in a nutshell, SEO is a series of best practices to ensure your site stands out in the search engines. The better your SEO, the more chance your site will have of appearing on the first page of the search results.
Keyword Research: Use keyword research tools like Ahrefs, SEMRush, or Moz to discover the phrases people use to find your site. There are plenty of cheaper keyword tools, but these three are the best of the best, and you will only need them for a month or two to find a year’s worth of content ideas. Sprinkle your phrases throughout the main headings and content so Google knows which page to show in the search results for the relevant terms.
On-Page SEO: Includes optimizing meta titles, descriptions, and headers with your keywords to improve SEO. SEOPress will ensure you don’t miss anything important.
Image Optimization: Images can be optimized with an “alt tag,” text that goes along with the image so the Google bots can understand it better. Image file sizes should also be as small as possible for faster loading times. This is where plugins like SMUSH come in handy.
Mobile Optimization: More people are browsing on their portable devices, so having a website that adapts to whatever screen real estate your visitor uses is essential for an optimal experience. Fortunately, most modern themes have this capability built-in, but it’s still worth checking.
Rich Snippets and Schema Markup: These features help to make your site stand out in the search results. Plugins like SEOPress can help ensure you get your schema markup correct.
Step 9: Go For Launch – Connect Your Website to the World Wide Web
Launching a website means you make the website accessible to the public on the internet. Until now, you’ve worked behind the scenes—designing, creating content, testing—to prepare for this moment. Once you’ve ensured everything works, you’re ready to show the world your brand-new website.
Publish Your Website
Preview Your Website: Before you launch, ensure every aspect of your website works as intended. Check the formatting, test all links, and ensure your website looks good on all devices (or as many as you can test).
Get a Second Set of Eyes: You are proud of your work but might be slightly biased. Get a friend or relative to check out your website. Ask them to gauge their experience with navigation, design, mobile responsiveness, and features.
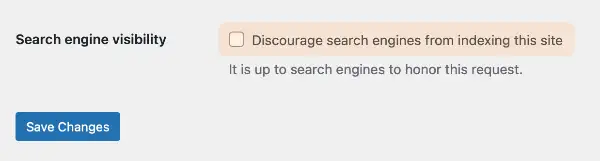
Check Search Engine Visibility Settings: Go to ‘Settings’ > ‘Reading’ in the WordPress dashboard. Ensure the ‘discourage search engines from indexing this site’ box is unchecked.
Promote Your Website
Creating your website is just the first step in increasing your online exposure. The next essential party of the process is to promote your website to reach your desired audience. Use the tips to help boost your website’s visibility.
Take Advantage of Social Media: Use platforms like Facebook, Twitter, Instagram, LinkedIn, and Threads to share your website’s content. If you run a business, consider using paid advertisements on these platforms to increase your reach.
Search Engine Optimization (SEO): Implementing SEO techniques can improve your site’s rankings on search engine results pages. This includes keyword optimization, creating quality content, and obtaining high-quality backlinks (see above).
Publish Regularly: Google loves fresh new content, and so do your readers. Keep your website from going stale by regularly updating content to improve your ranking in search results and give your audience a reason to visit regularly.
Email Marketing: Build an email list to deliver news, updates, or promotional content directly to interested users. A newsletter subscription on your site is a great way to collect emails.
Network and Collaborate: Connect with other bloggers or influencers in your industry. Create guest posts on each other’s websites or collaborate on a project. Their readers will learn about you and may become a part of your regular audience.
Online Directories and Review Sites: If your site offers a local service, listing it on online directories like Google My Business or Yelp can boost your visibility.
Consider Paid Advertising: Use pay-per-click (PPC) advertising with platforms like Google AdWords. You can target specific demographics to enhance the visibility of your website to your desired audience.
Community Engagement: Participate in forums, comment sections, and Q&A sites like Quora. You can subtly raise attention to your website by offering valuable insight, building its reputation, and attracting potential visitors.
Webinars and Podcasts: Hosting informational webinars or appearing as a guest on industry-related podcasts can also support your website.
Measure Your Performance: Utilize tools like Google Analytics to track your website’s performance. This tool will give you in-depth insights into where your traffic is coming from and what strategies are working (or not!), allowing you to tailor your approach and maximize your promotional efforts.
Remember, effective promotion takes time and persistence. Don’t be discouraged if traffic doesn’t spike overnight; it rarely does. Keep creating engaging content, optimize your SEO, and experiment with different strategies, and you will see steady progress.
Set Up Your Website Today – It’s Easier than You Think
Don’t delay in launching your online project. With Hostinger’s user-friendly interface, excellent customer support, and the versatility of WordPress, you have the ideal recipe for a robust, engaging website.
No matter what your goal is, whether it’s promoting your business, sharing your ideas through a blog, or showcasing your portfolio, it’s time to put your digital foot forward. Sign up with Hostinger today and embark on this exciting journey of bringing your passion to the online world!
Frequently Asked Questions (FAQ)
Need more inspiration on creating websites?
Unlock the power of web building mastery with our top-notch guides.

How to make a website
Learn how to make a website from scratch as a beginner using a website builder.

How to start a blog
Learn how to start a blog and turn it into a money-making venture with our comprehensive guide.

How to start an online store (e-commerce)
Learn how to start an online store through easy steps and successful strategies.

How to make an online portfolio
Learn how to make an online portfolio with the best templates and showcase your creative work.

How to SEO your site
Learn how to optimize your website for search engines and improve your ranking.

How to start affiliate
Learn how to start affiliate marketing through easy steps and successful strategies.